How to Invite and Delete Users to Your Company and Entities
Bookkeep has the foundation to handle both simple businesses and complex organizations, including accounting firms with many clients.
Bookkeep is equipped to handle businesses with various sub-entities, each with their own set of accounting records. It can also handle accounting firms where each entity is a client of that firm.
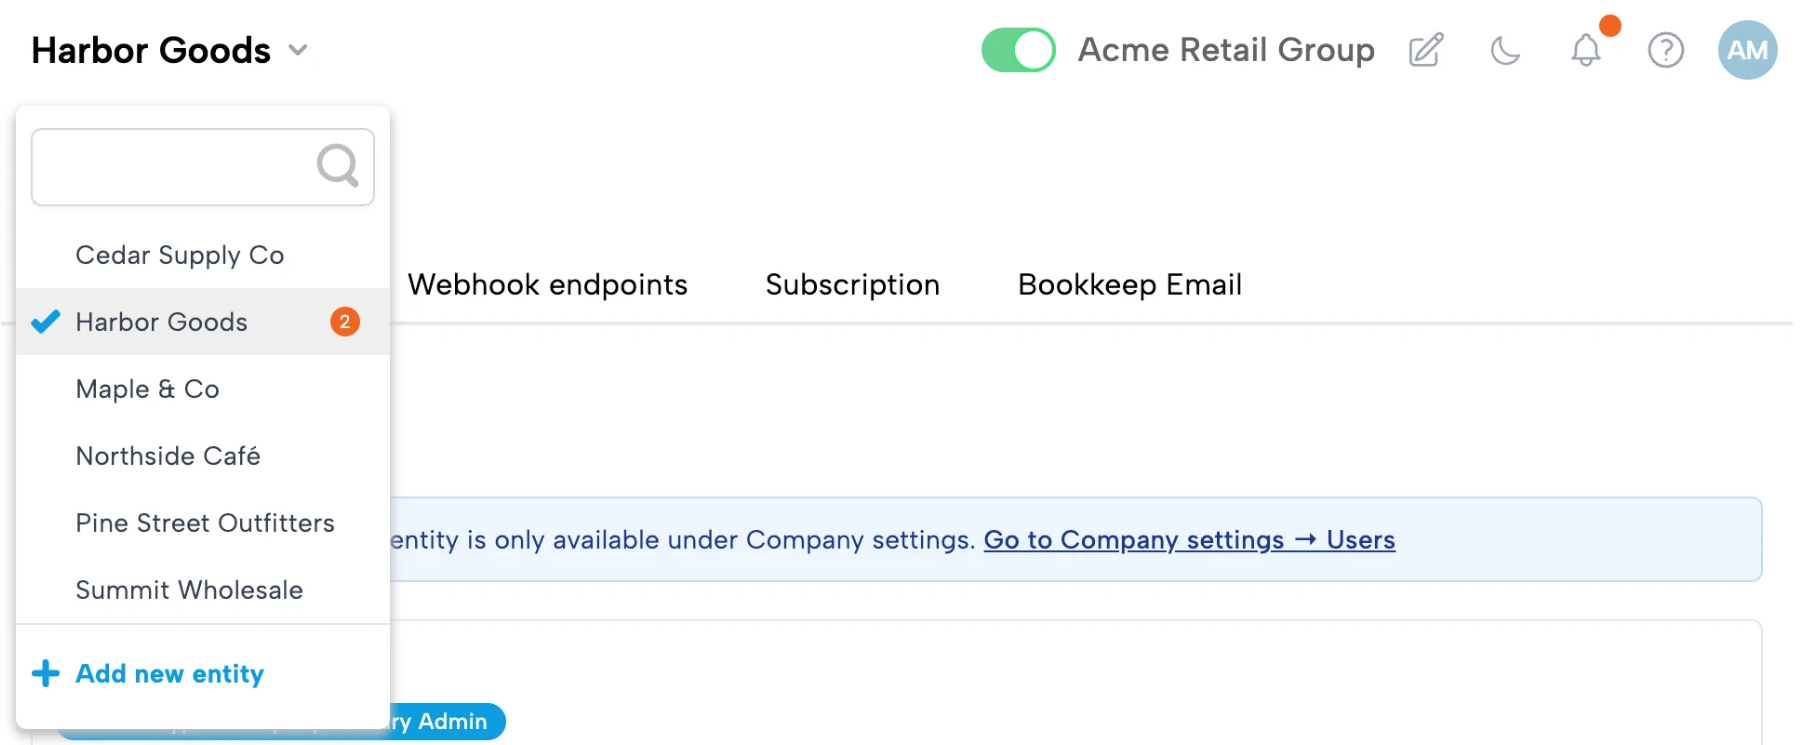
In the image above, "Acme Retail Group" is the company and its entities are listed in the dropdown. "Harbor Goods" is the active entity currently being worked on.
Bookkeep gives you the control to invite and delete users from a company. When inviting someone to a company, you can extend an invitation to any or all of your entities. By default, all admins and primary admins get access to every entity. The key distinction is that only primary admins can delete users from the company, whereas admins cannot. Learn more about our different user roles.
Inviting Users
To invite someone to your company, visit "Company Settings" from the left navigation and then select the "Users" tab:
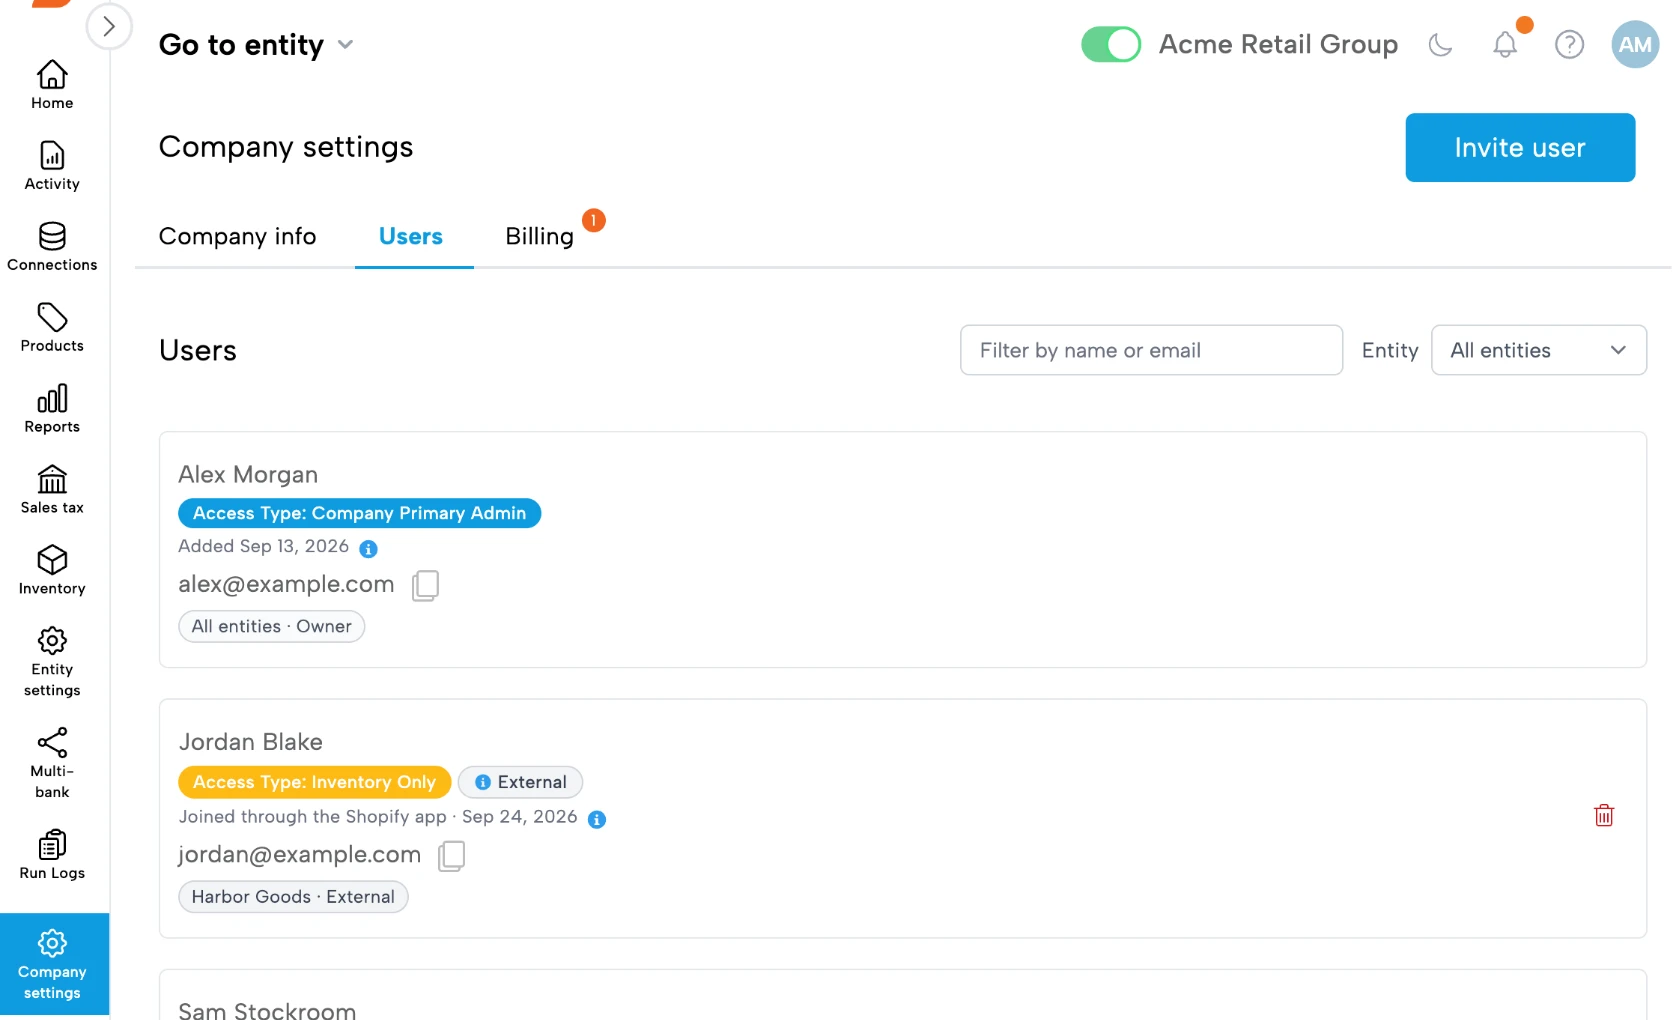
From the Users tab, you can select "Invite User" on the right as shown below:

In the invitation window, enter their email and select their role. Everything else is in the same window: there is no second step. If you choose Admin, the entity list is hidden, since admins get access to all entities. If you choose a Staff role or Inventory Only, pick the entities they will have access to in the same window. For a Staff role, pick at least one entity or switch on "Can access all entities". Inventory Only doesn't offer "Can access all entities", so pick at least one entity. Otherwise Bookkeep shows "Pick at least one entity." and doesn't send the invitation.
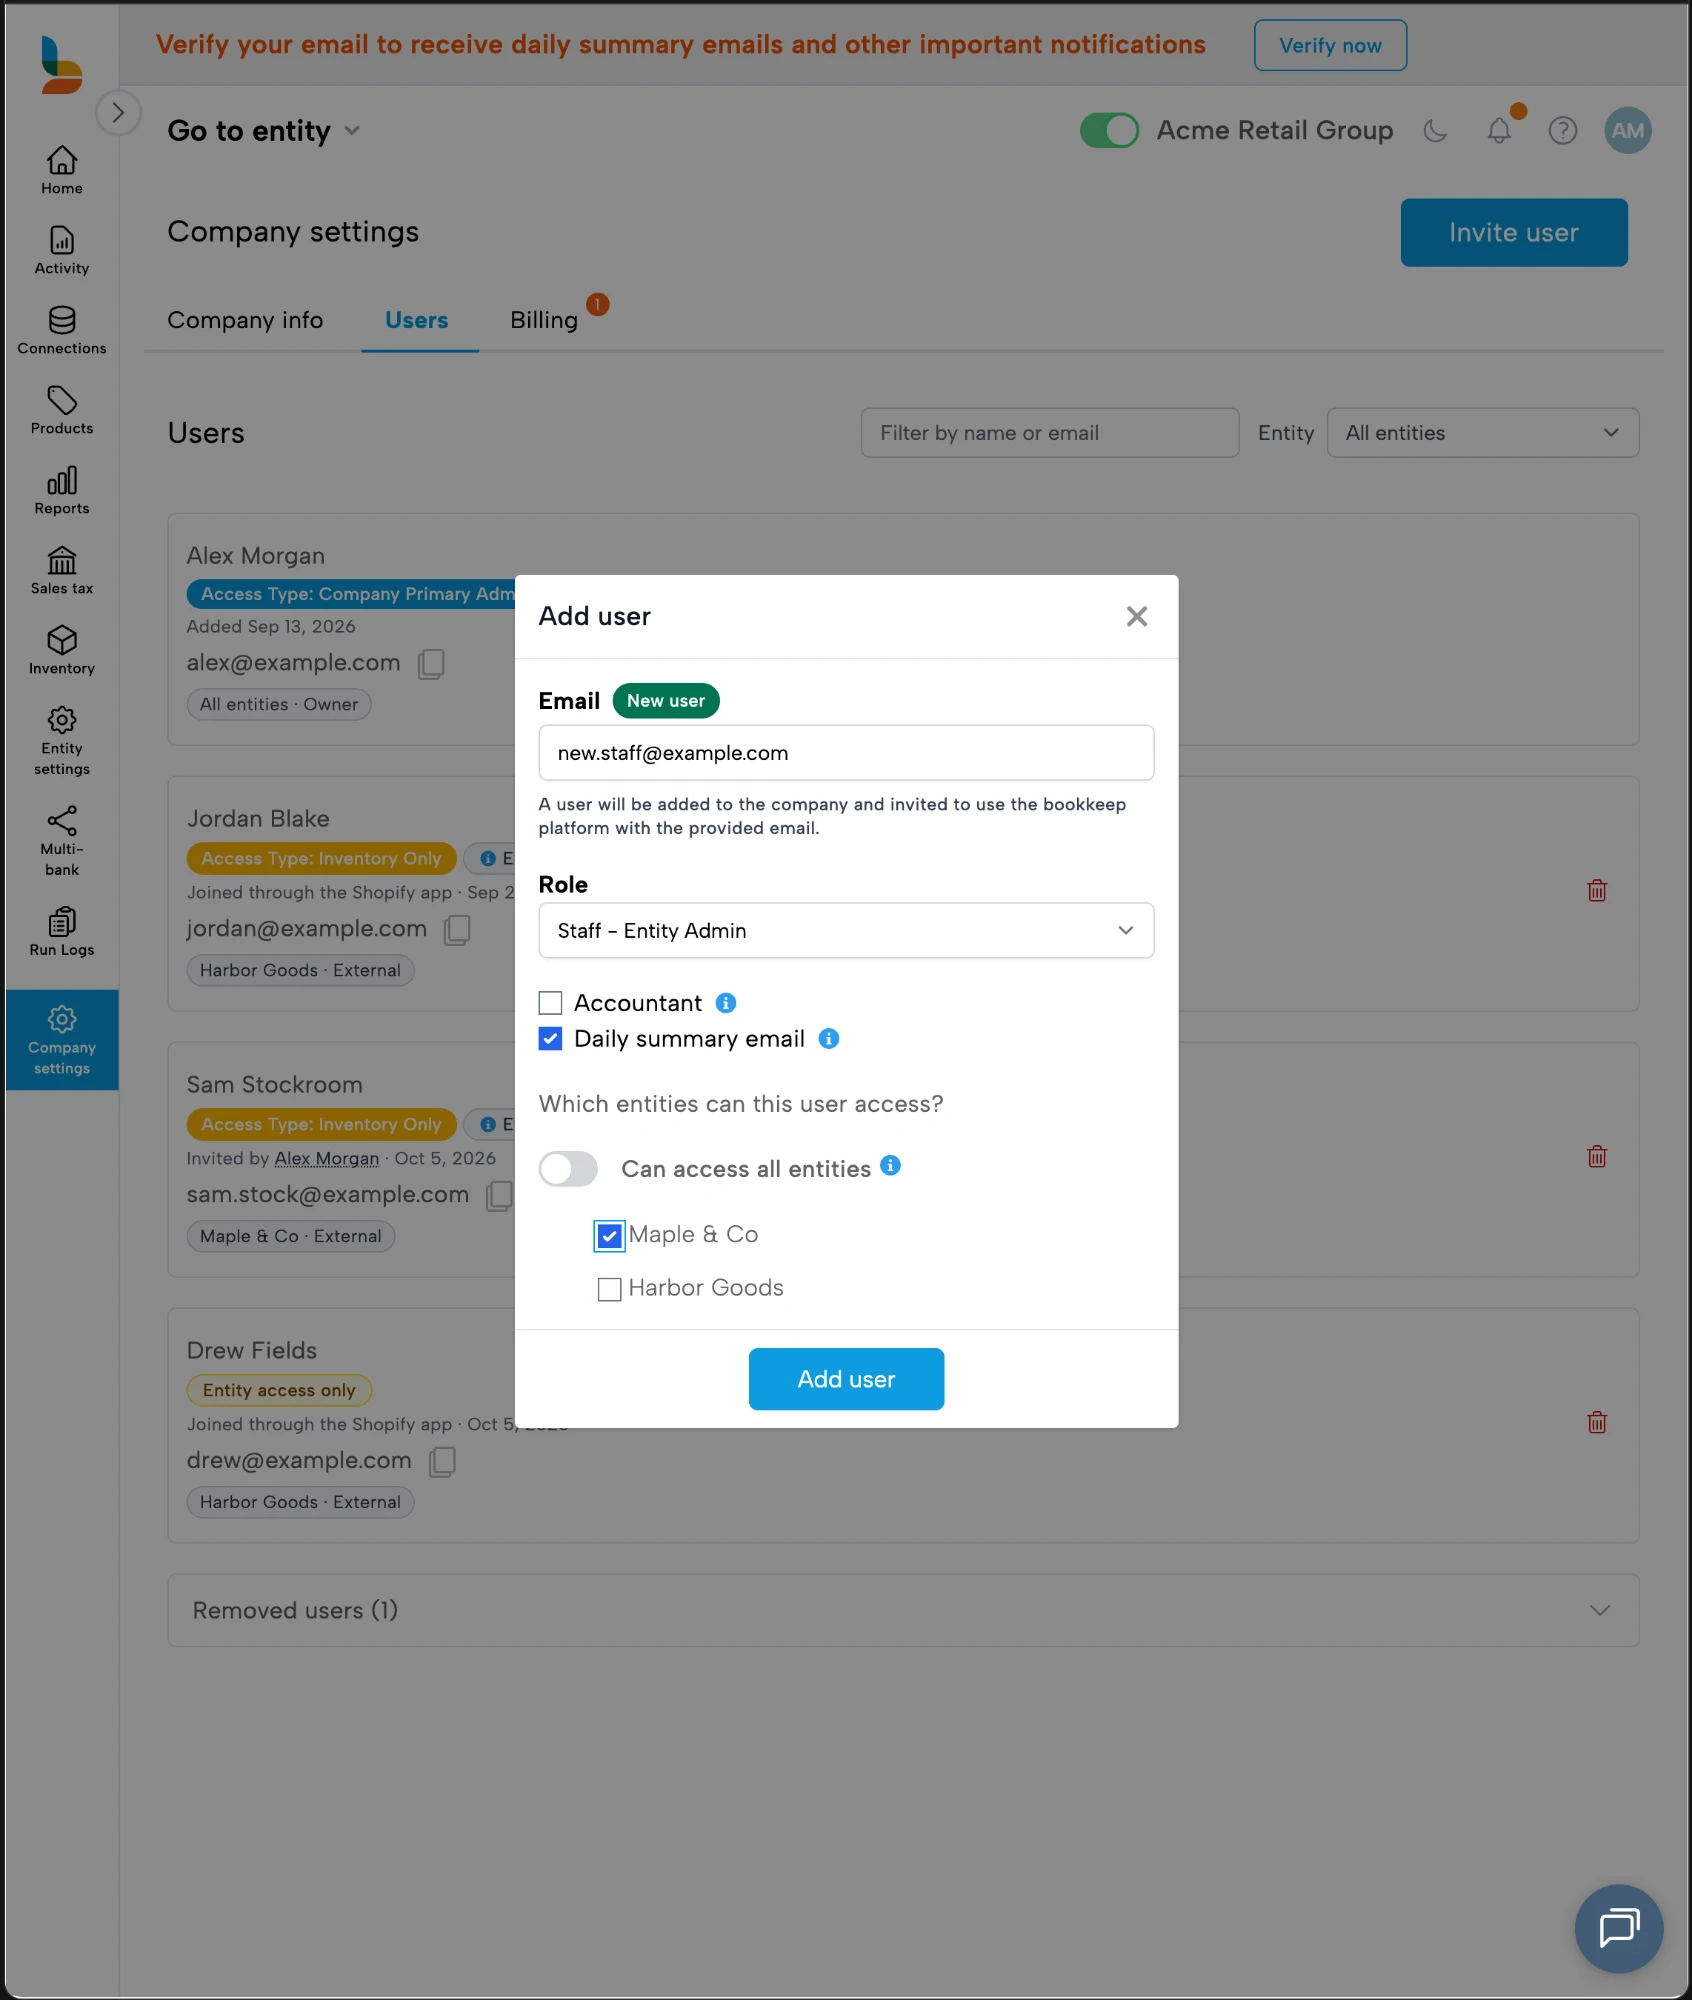
For a Staff role, "Can access all entities" includes all entities added to the company in the future:
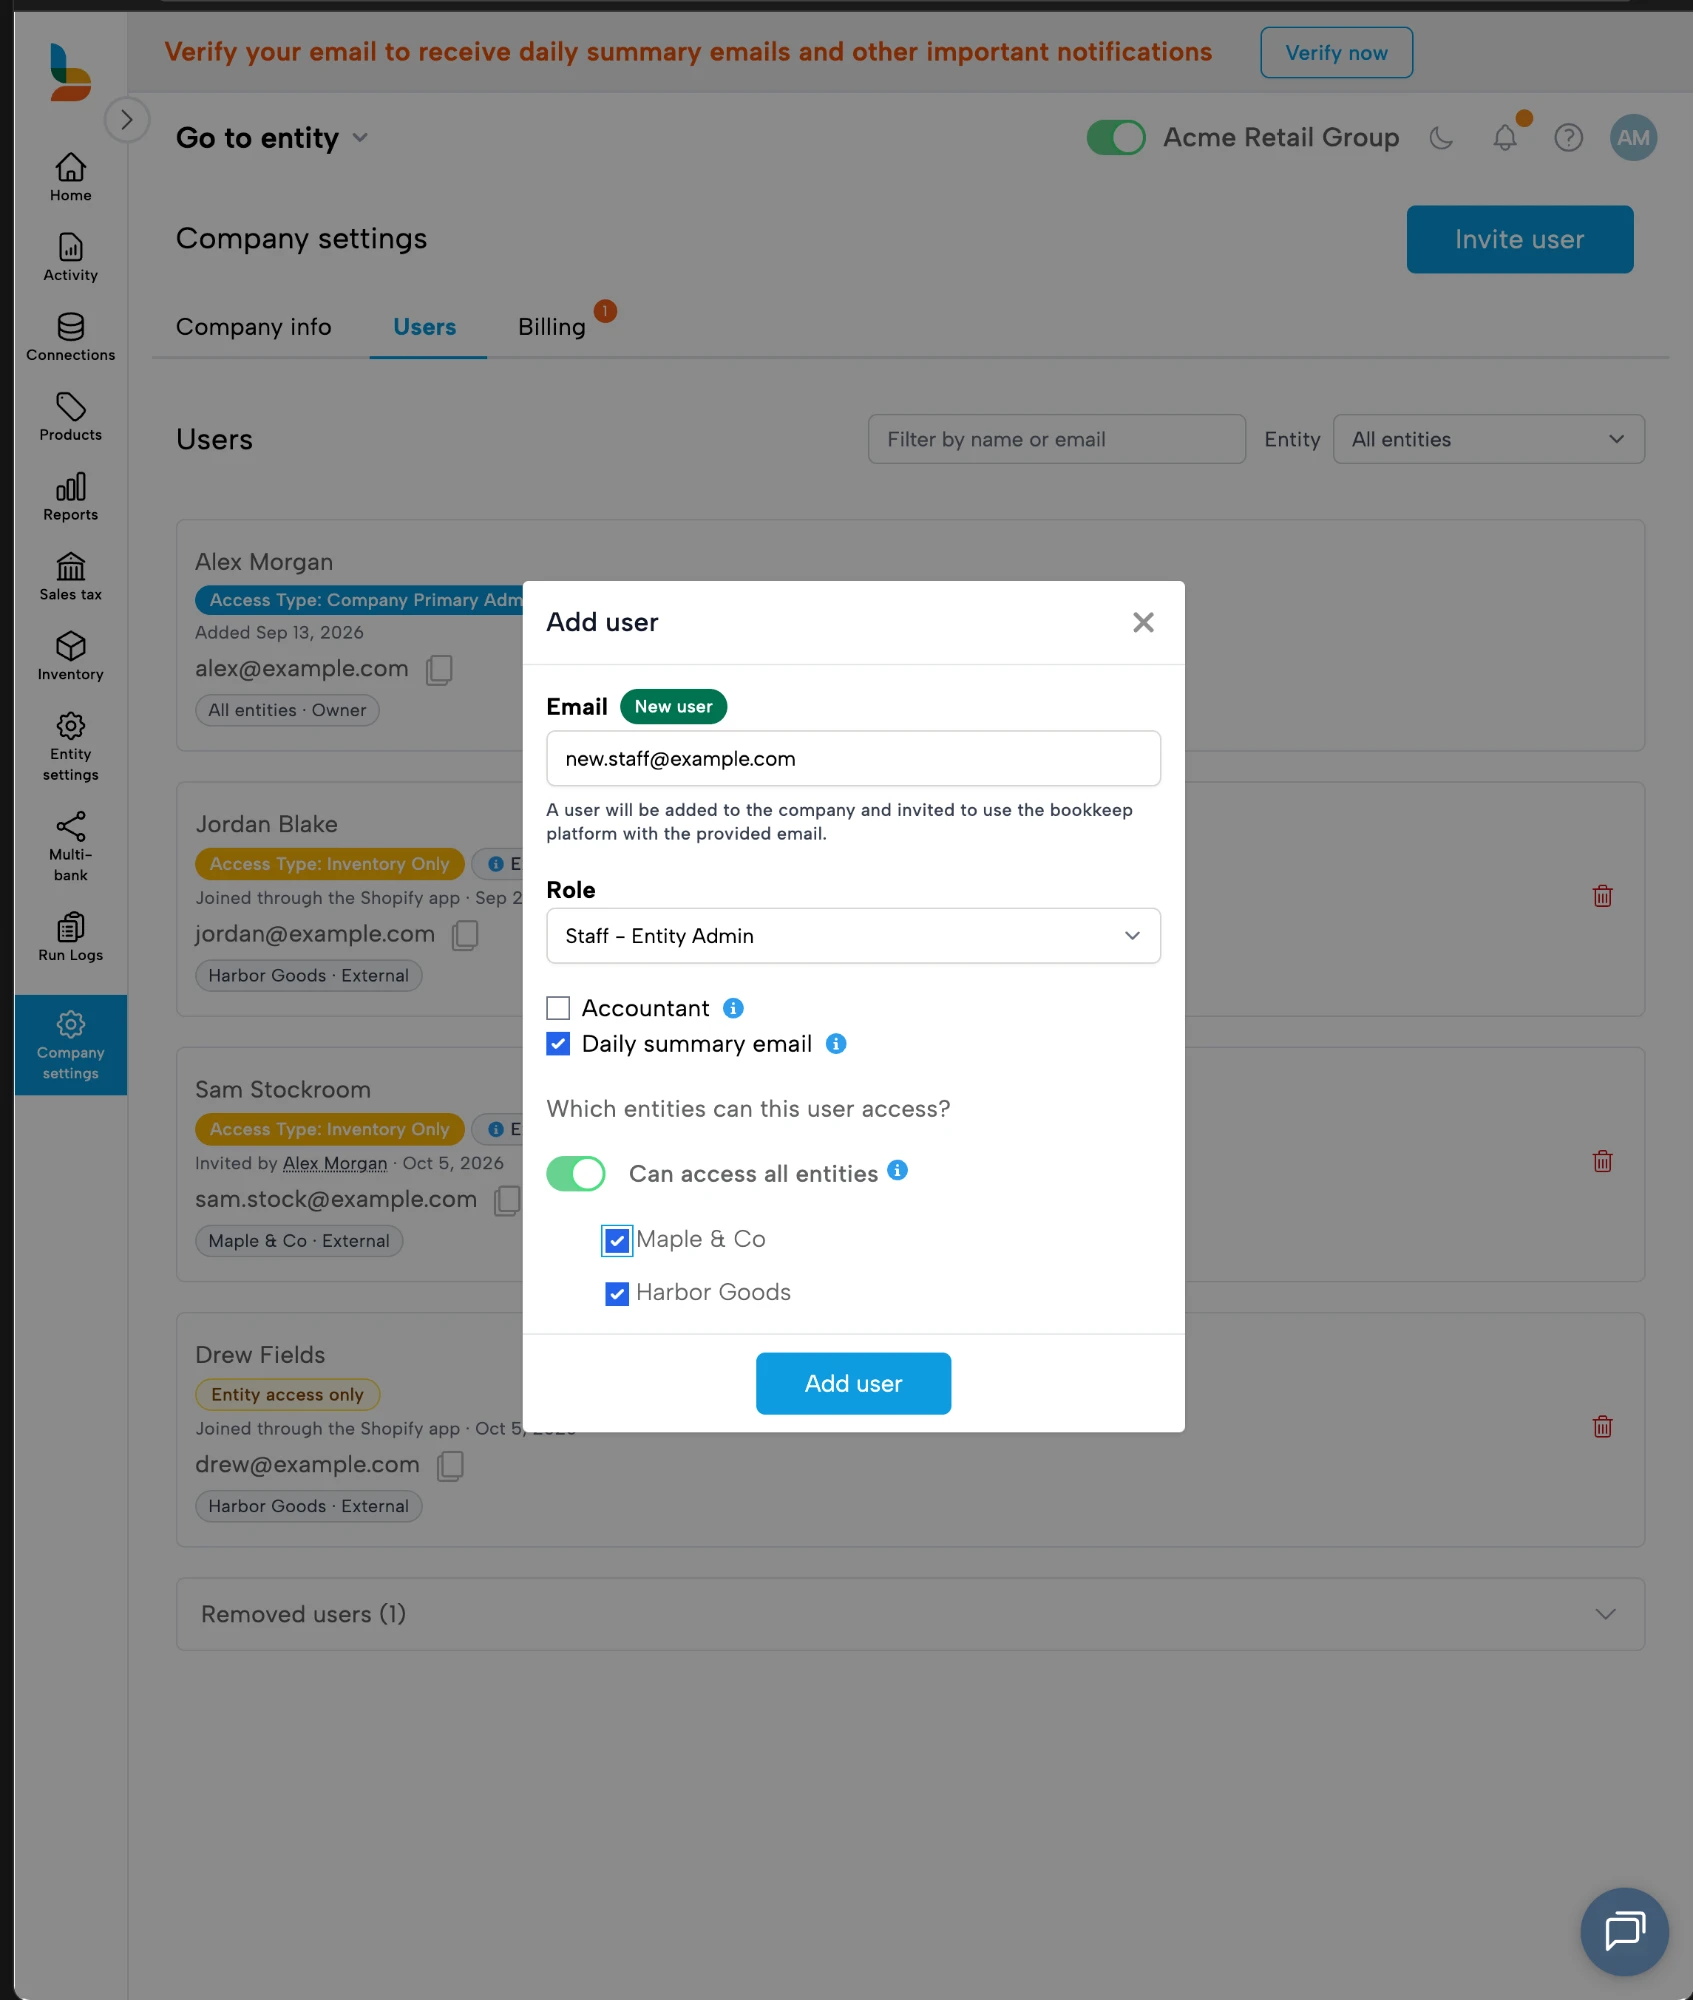
Two optional checkboxes appear in the same window. Hover over the info icon next to each to see what it does:
- Accountant: marks this person as your outside accountant or bookkeeper. Once you have one, Bookkeep stops prompting you to invite an accountant, and they're never asked to add a payment method.
- Daily summary email: subscribes them to the Daily Summary Email. It's hidden for Inventory Only, since those users don't receive it.
Once you send the invitation, the invited user receives an email to complete the setup from their side. Until they accept, the invitation is listed on the Users tab with who sent it and which entities it will grant.
Inviting an Inventory Only User
To give someone access to Bookkeep Inventory without exposing the rest of Bookkeep, select Inventory Only in the Role dropdown. These users work in Bookkeep Inventory from the Shopify Admin, where Bookkeep runs as an embedded app:
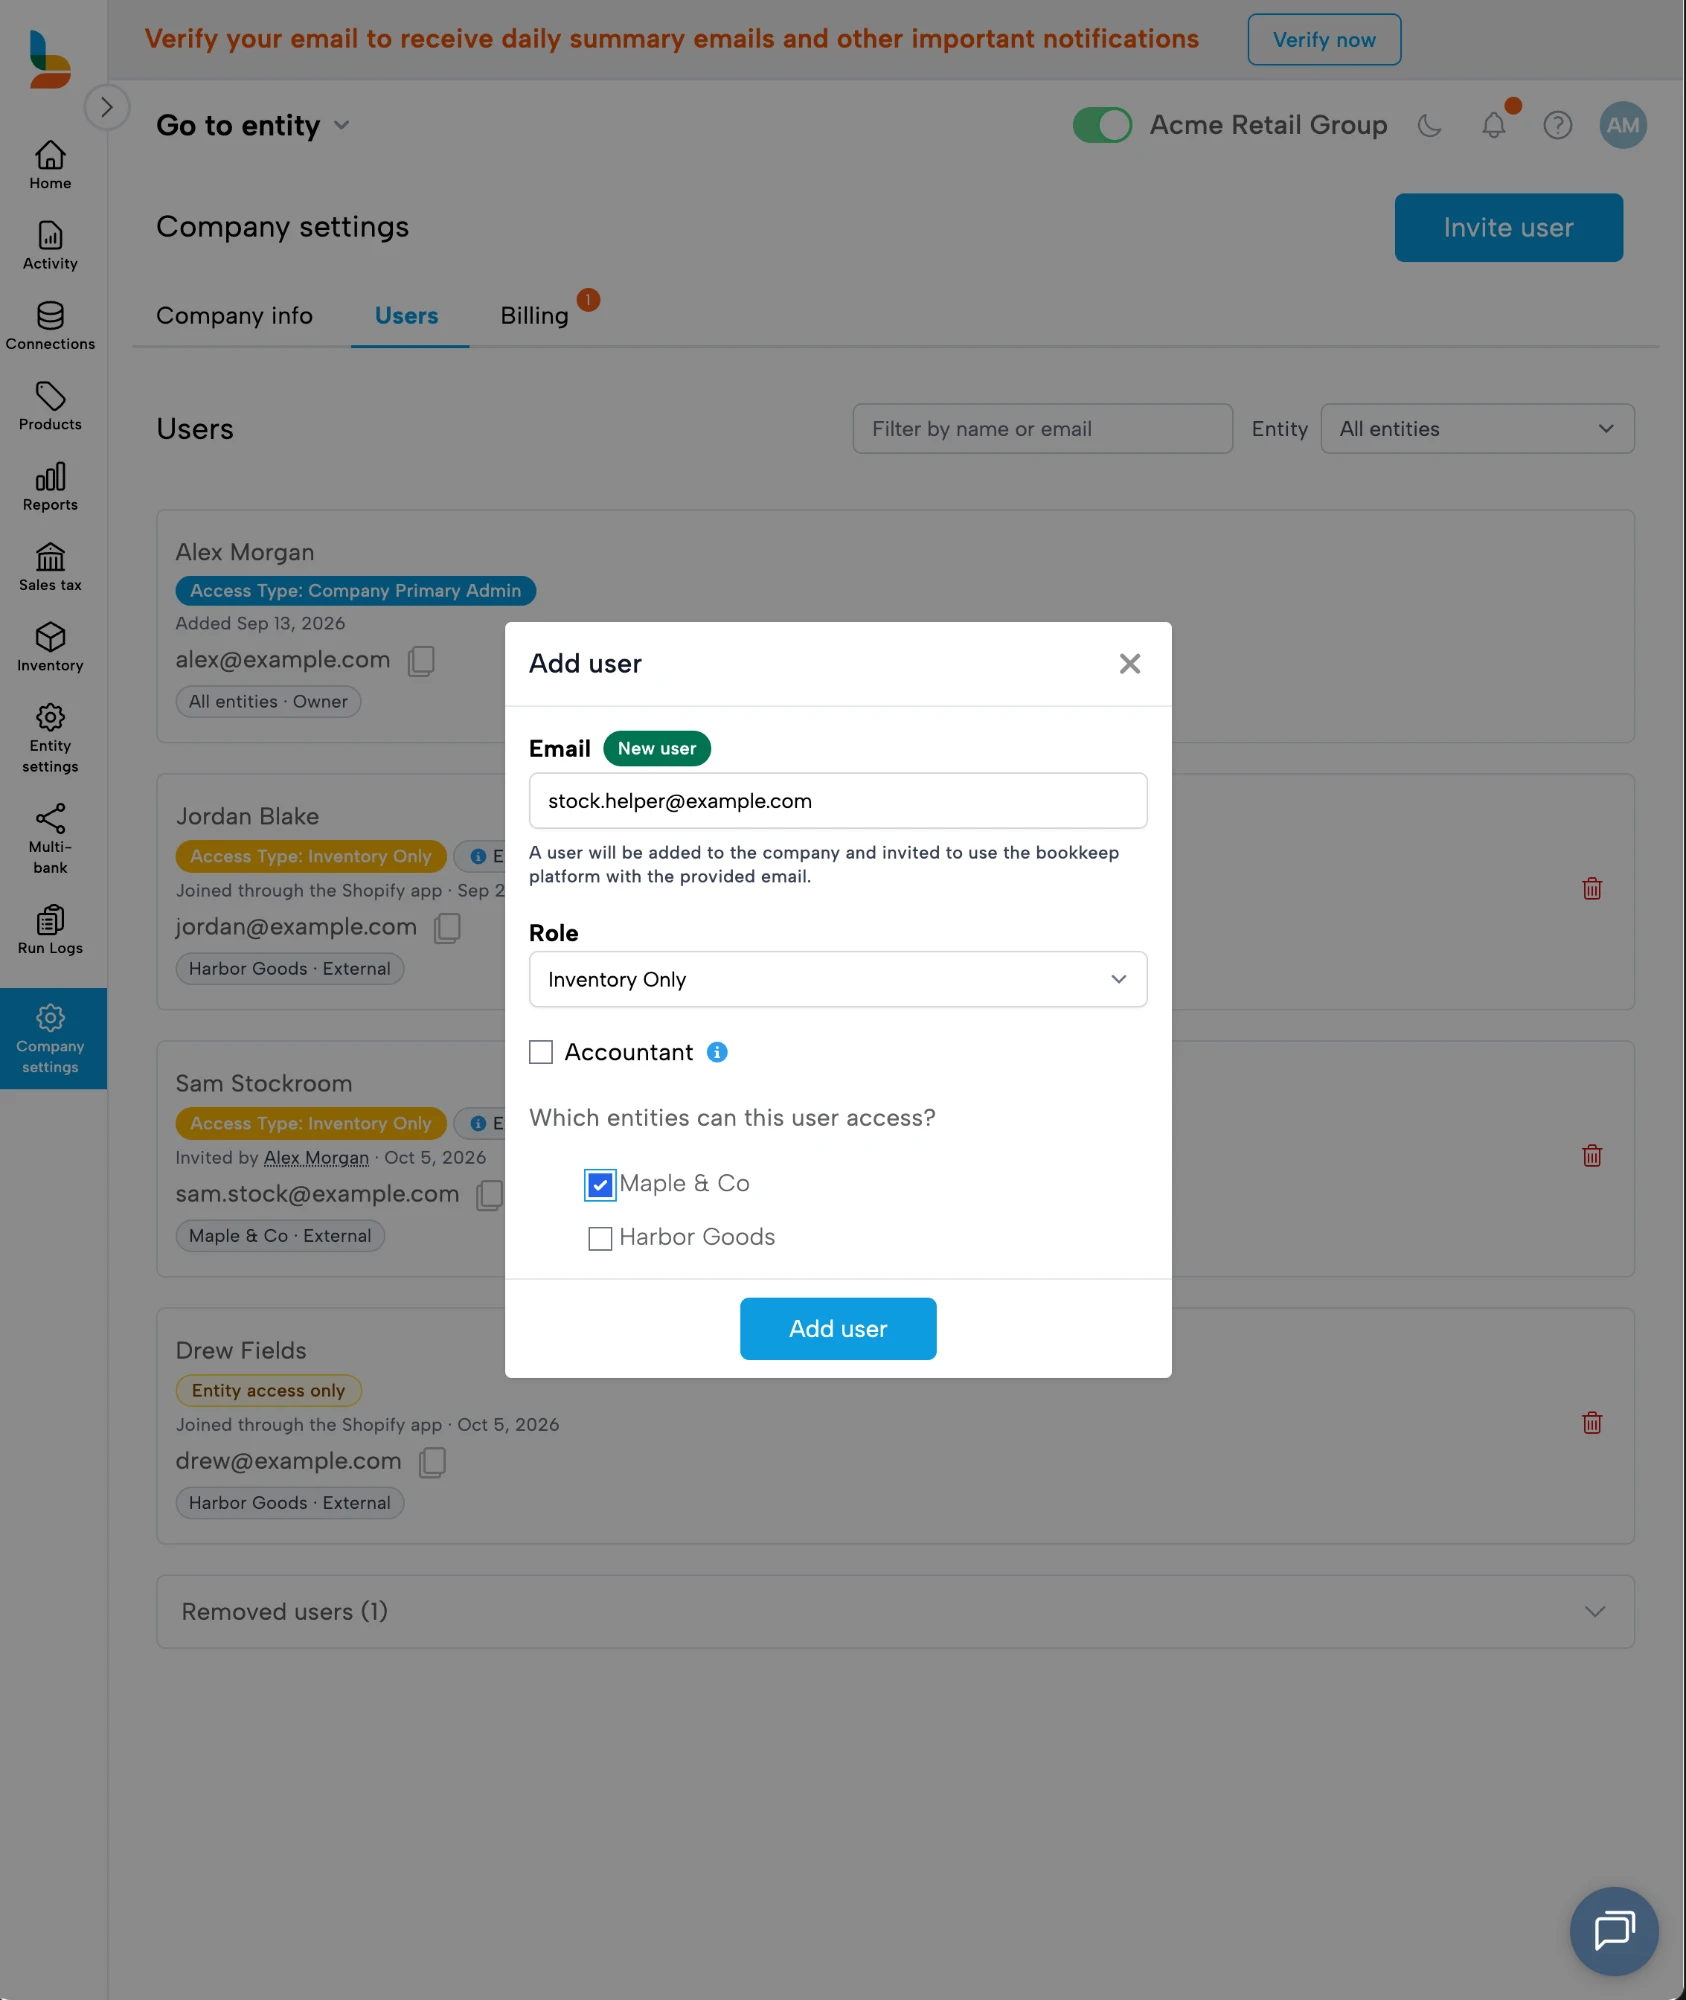
Then, in the same window, select the entities this user should be able to access and choose "Add user". If you leave every entity unticked, Bookkeep asks you to pick at least one:
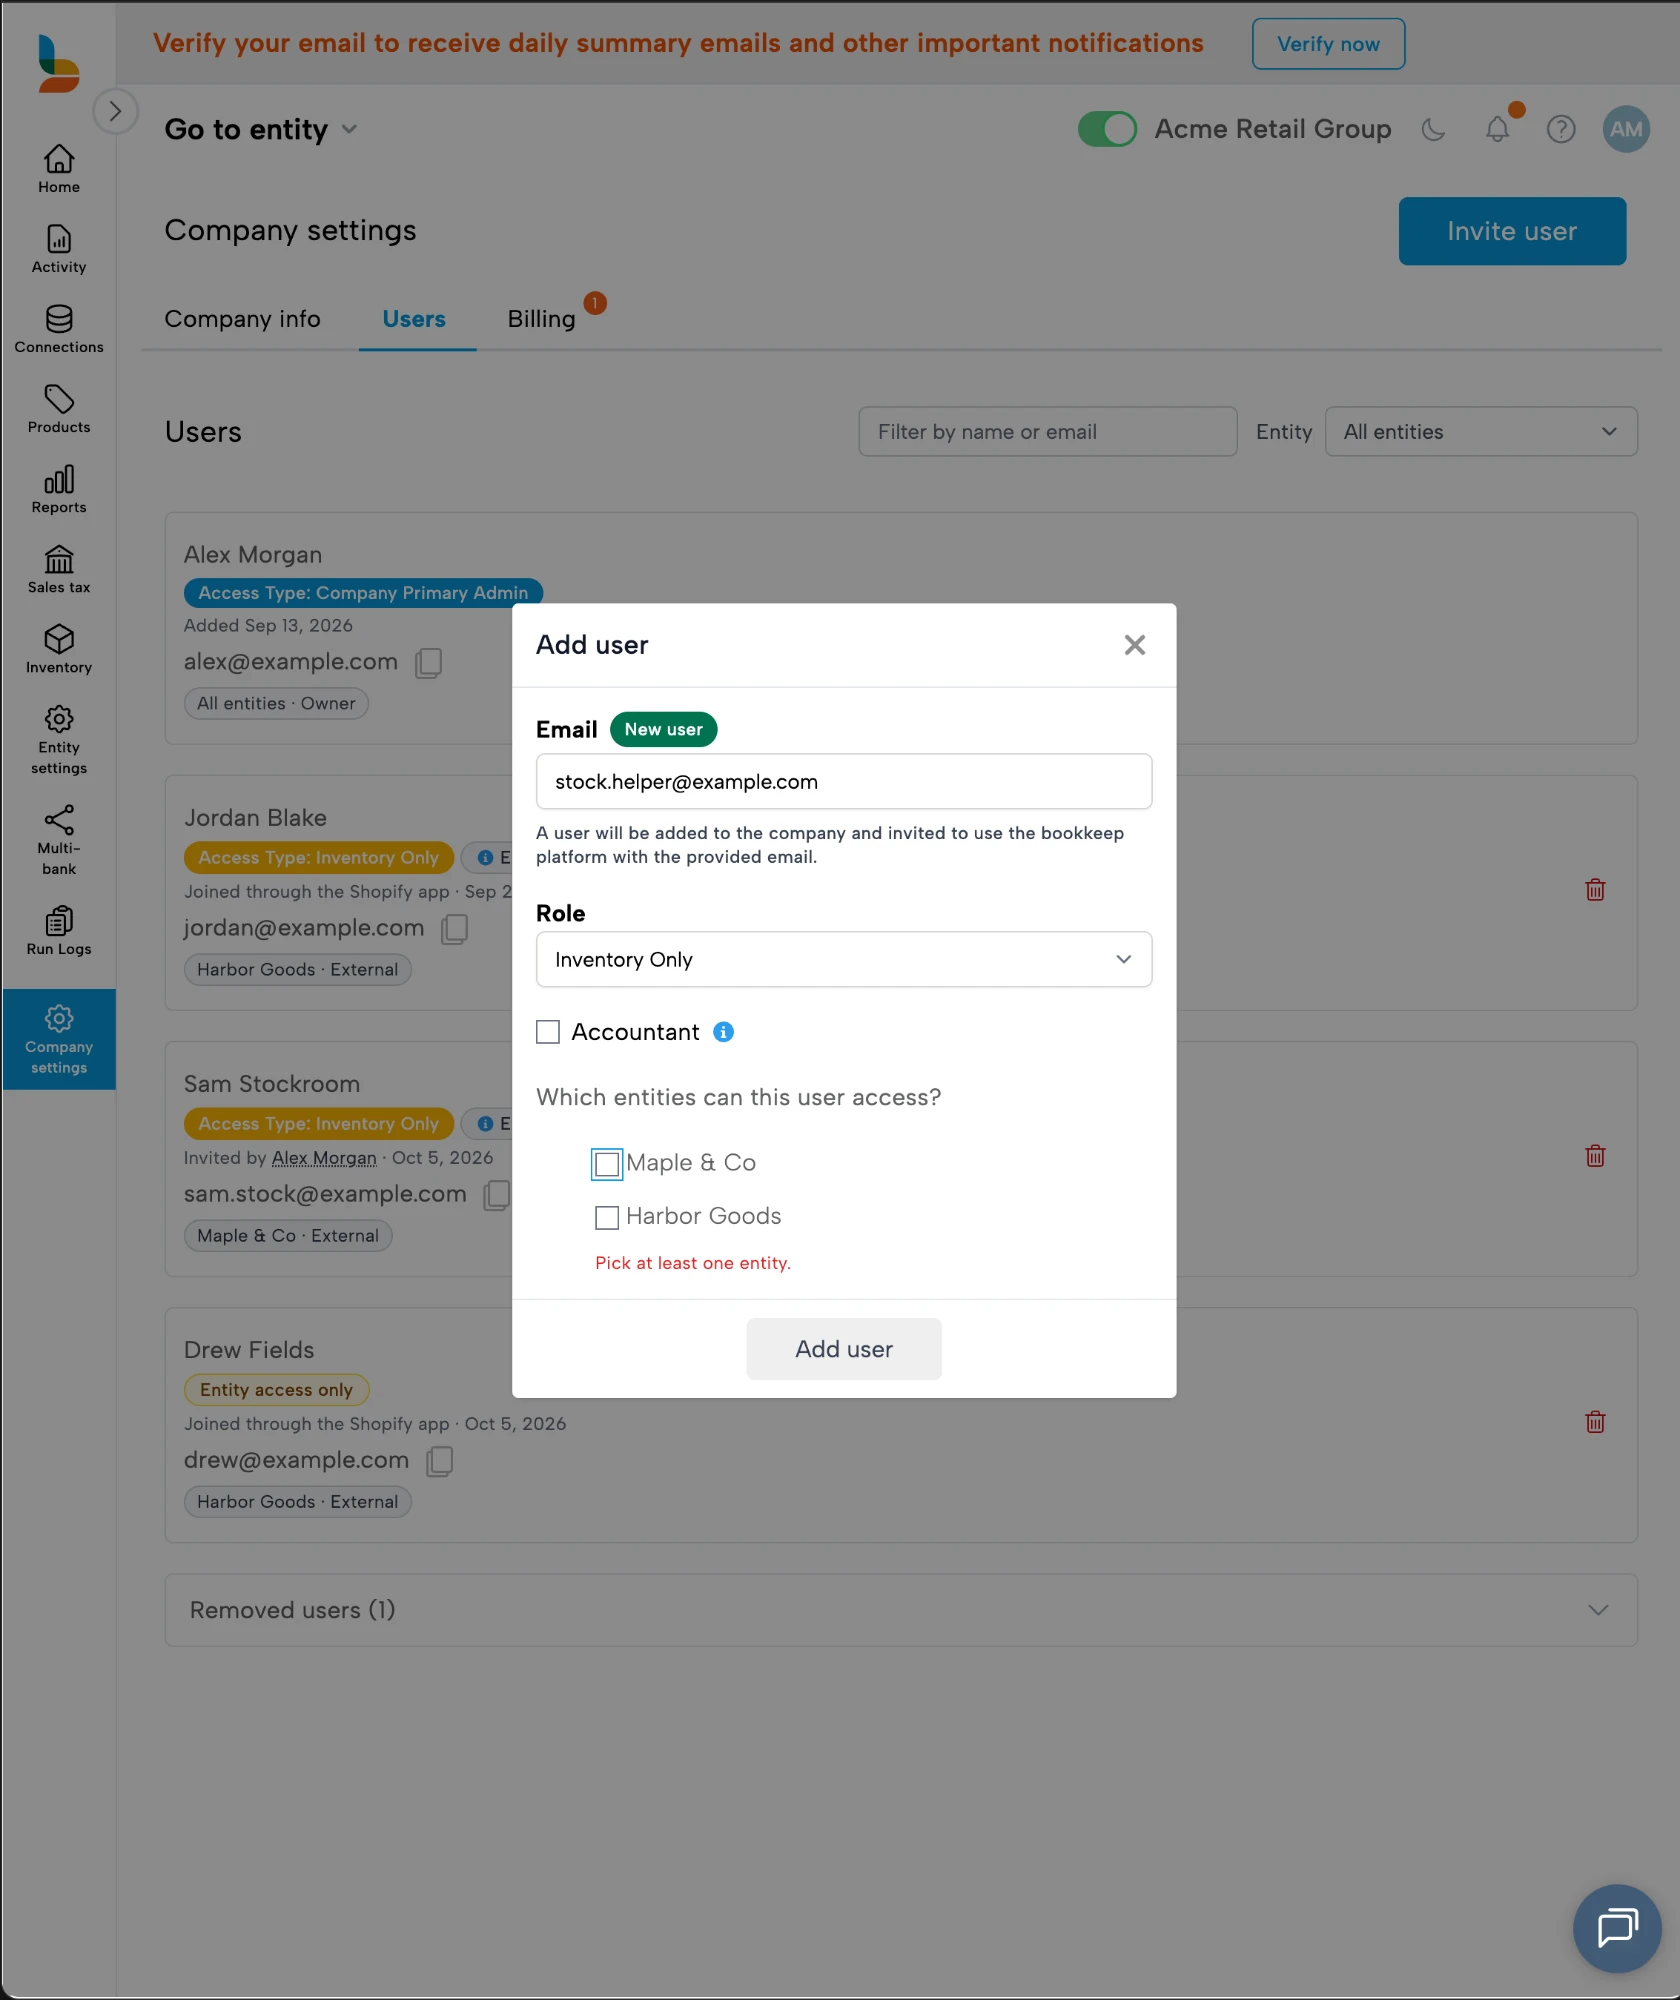
Inventory Only permissions are set when you create the invitation, so the user is restricted to Bookkeep Inventory from the moment they accept it. You no longer need to invite the user first and then ask support to tighten their permissions afterward.
Because this role is scoped to the entities you pick, the "Can access all entities" option is not offered. Entities you add to the company later will not automatically extend this user's access — you will need to grant it explicitly. Learn more about what this role can and cannot do in Bookkeep User Types.
You choose Inventory Only when you invite someone. If a user already has broader access and you want to restrict them to Bookkeep Inventory, contact support@bookkeep.com.
Seeing Who Has Access
The Users tab lists everyone with access to any of your company's entities, not only company members. That includes people with Entity access only: usually store owners or staff who opened the Bookkeep app from their Shopify Admin (see Add Users to the Bookkeep App within Shopify).
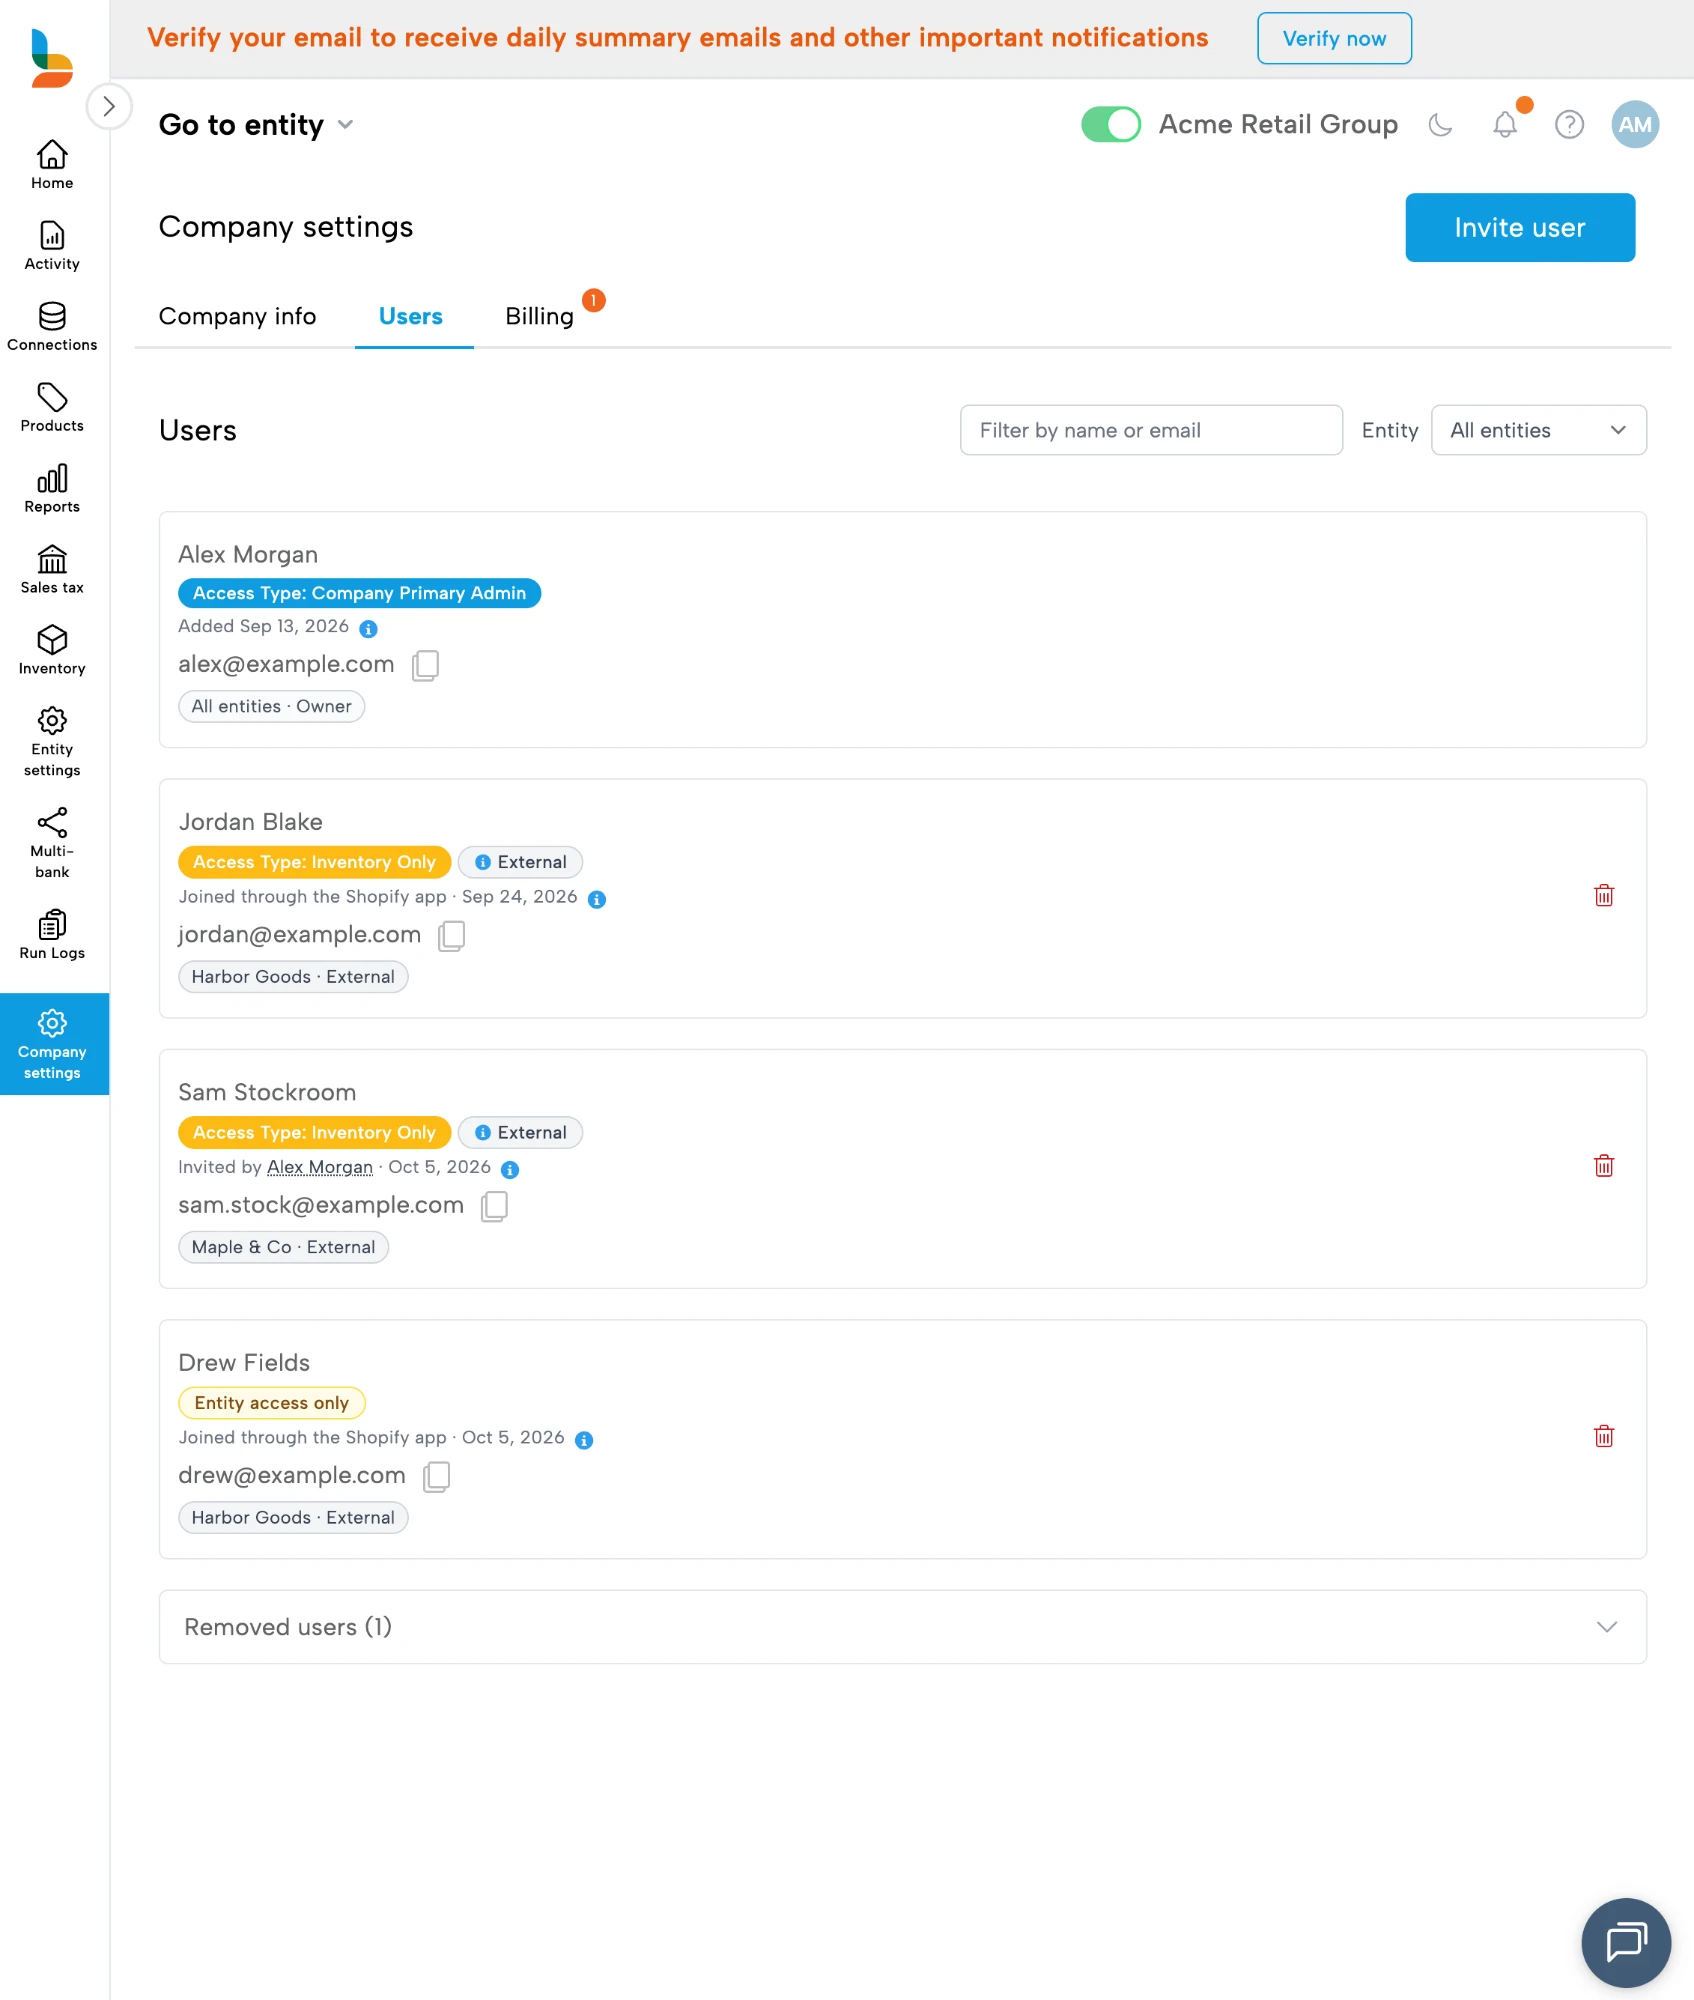
Each row shows:
- Access Type: their role, or Entity access only. Inventory Only users also carry an External badge.
- How they got access: for example "Invited by Alex Morgan · Sep 17, 2026" (hover the name to see their email), "Joined through the Shopify app · Oct 3, 2026", or "Added Sep 2, 2026". Hover the info icon after that line for the full story. It says who invited or added them, which store they opened the Bookkeep app from, whether a connect request named them as the app's installer, and whether they were removed earlier and later came back.
- Entities: which entities they can open and their role on each, such as "Maple & Co · Admin" or "Harbor Goods · External". Company admins show All entities.
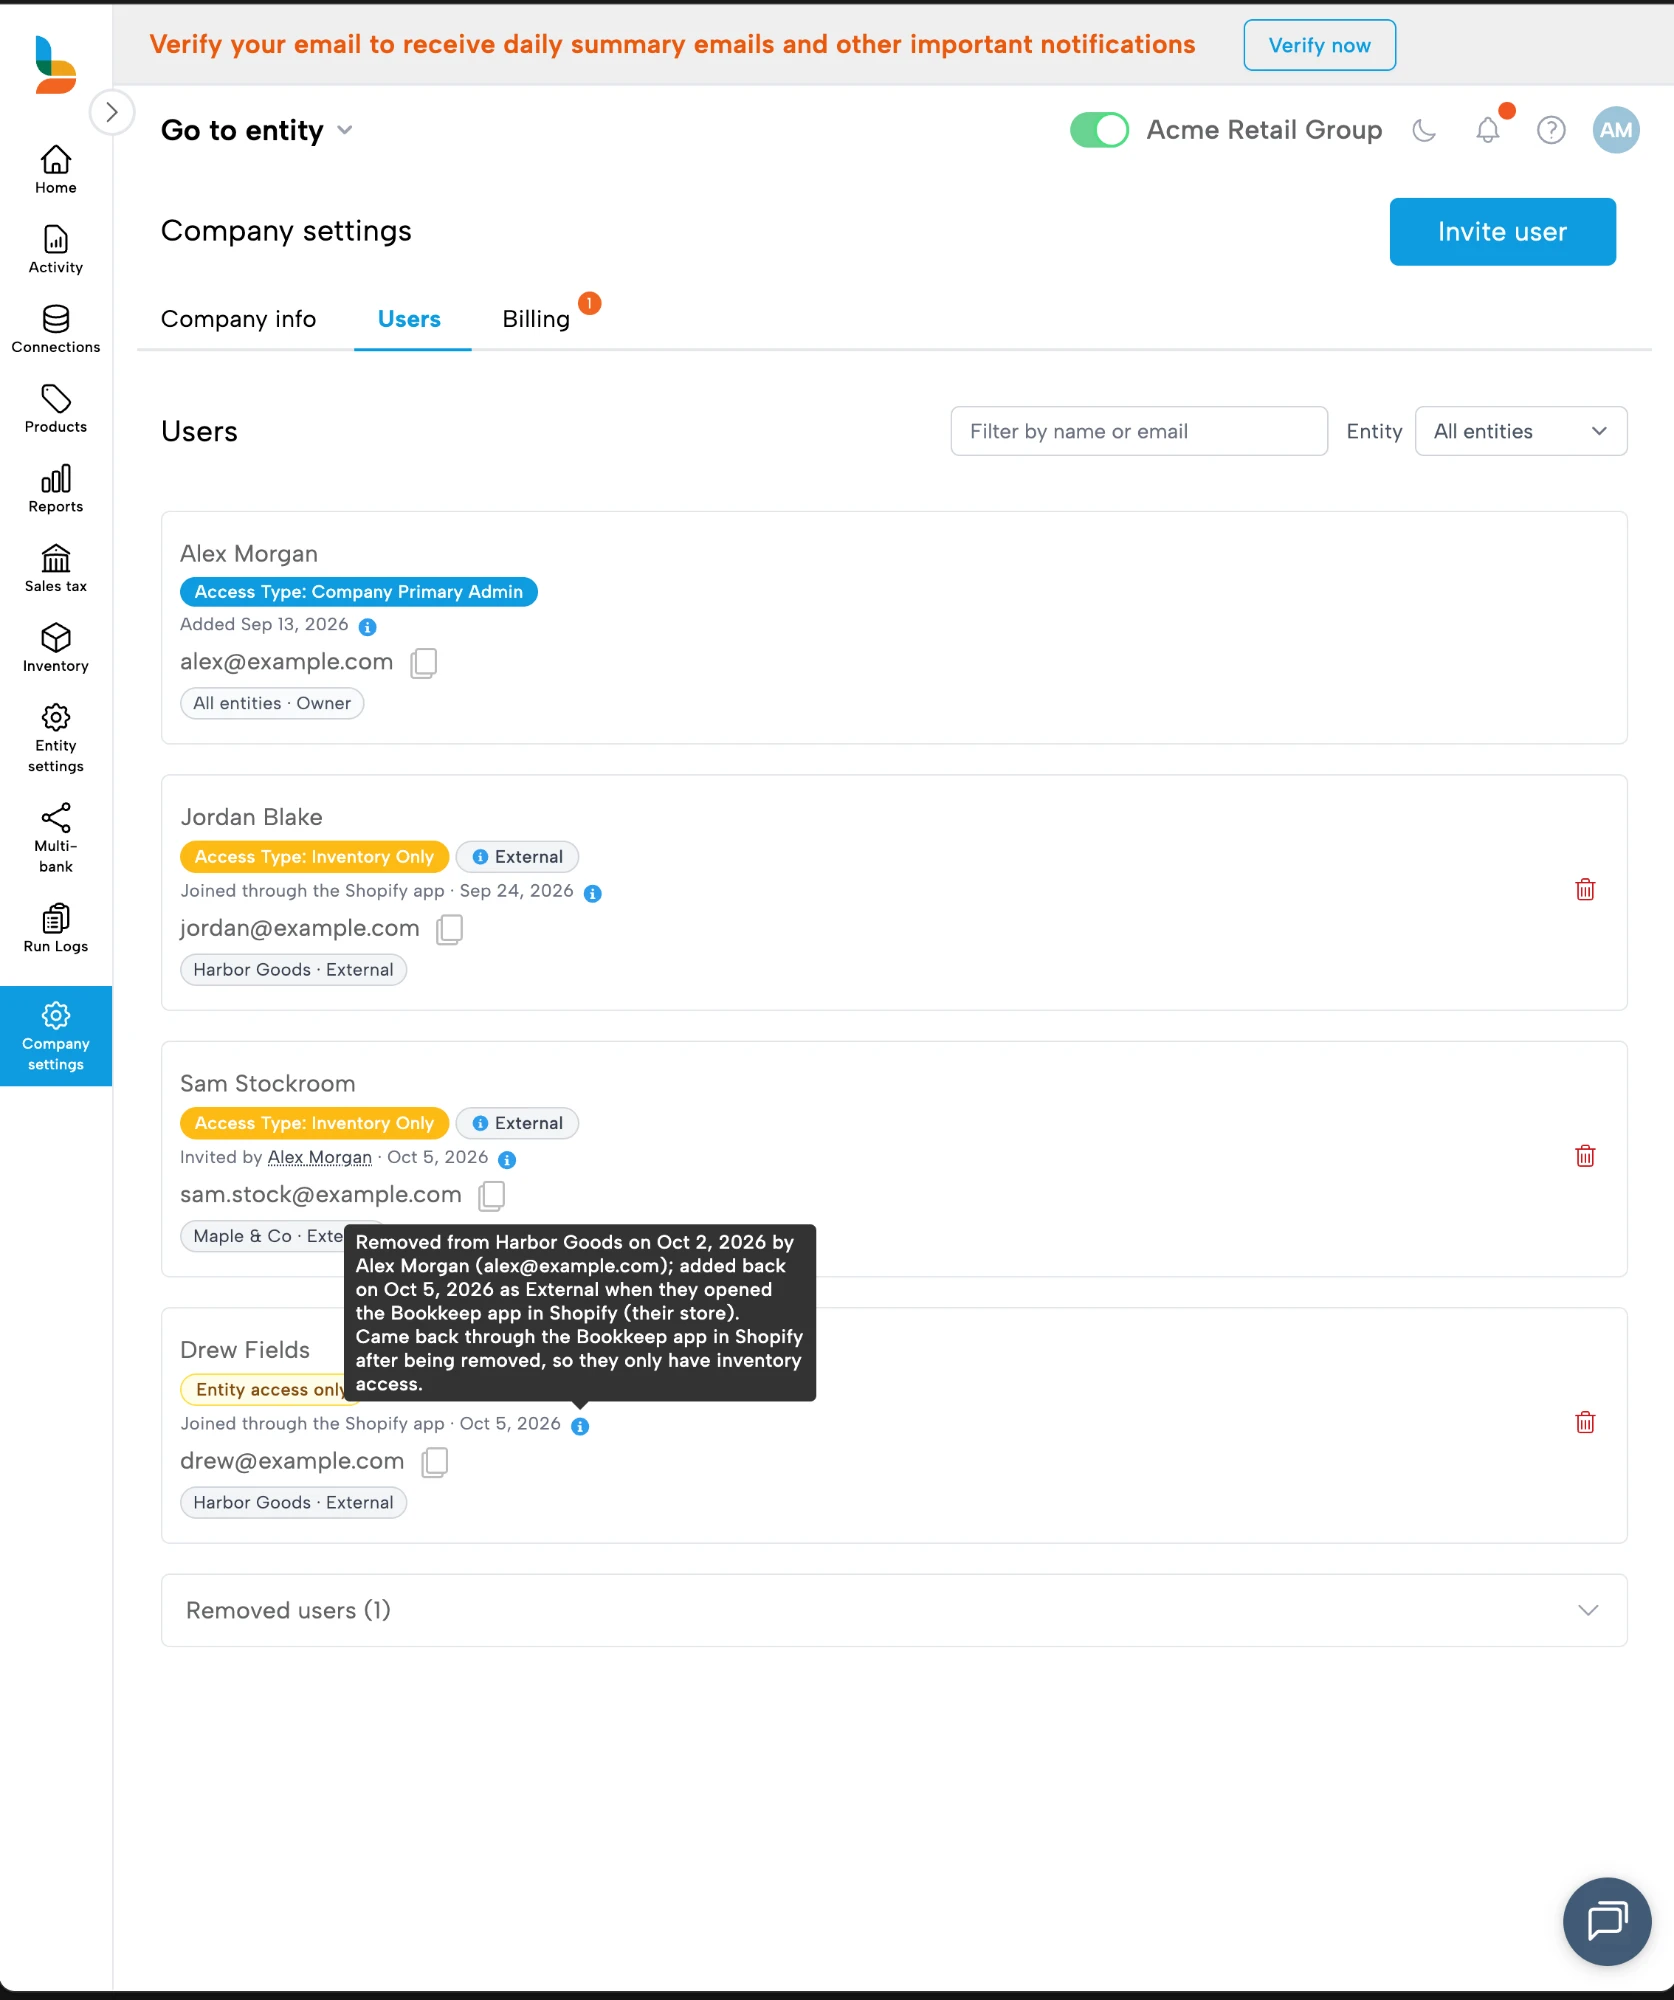
Use Filter by name or email to find someone quickly, and the Entity dropdown to list only the people with access to one entity. Click the copy icon next to an email to copy it; the icon confirms with "Copied".
People who have been removed are listed under Removed users at the bottom (collapsed). Each one shows when they were removed and who removed them. Removals made before October 2026 show the date but not who did it.
Seeing Who Has Access to One Entity
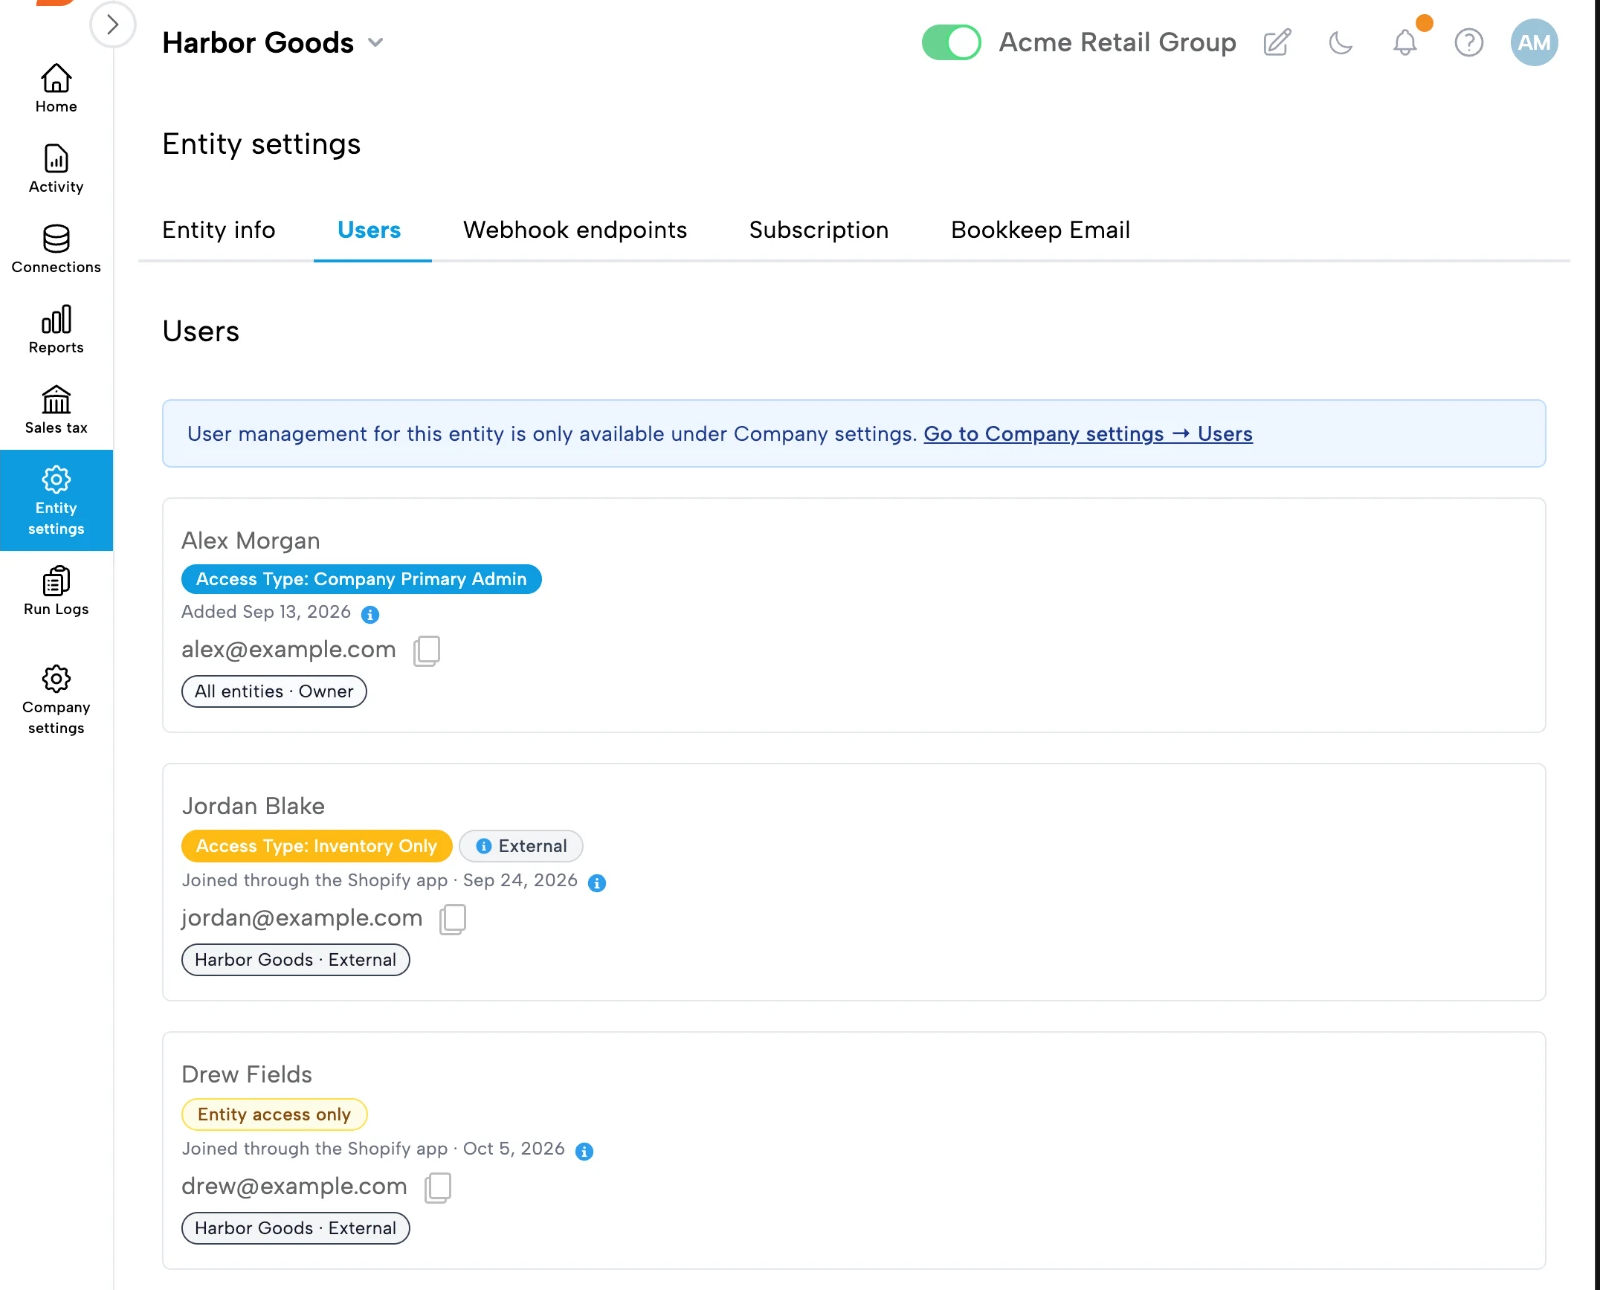
You can also see who has access to a single entity from Entity Settings → Users. Before October 2026 this tab was hidden for entities that belong to a company. It is now open to anyone who can open Entity Settings, including Staff - Entity Admin users, who can't open Company Settings.
It shows the same rows as the company Users tab (Access Type, how they got access with its info icon, and their role on this entity), plus, when there are any, the people removed from this entity under Removed users. The list is read-only: adding, editing and removing users is only available under Company Settings → Users. If you can open Company Settings, the banner at the top links straight to the company Users tab, filtered to this entity.
Editing Users
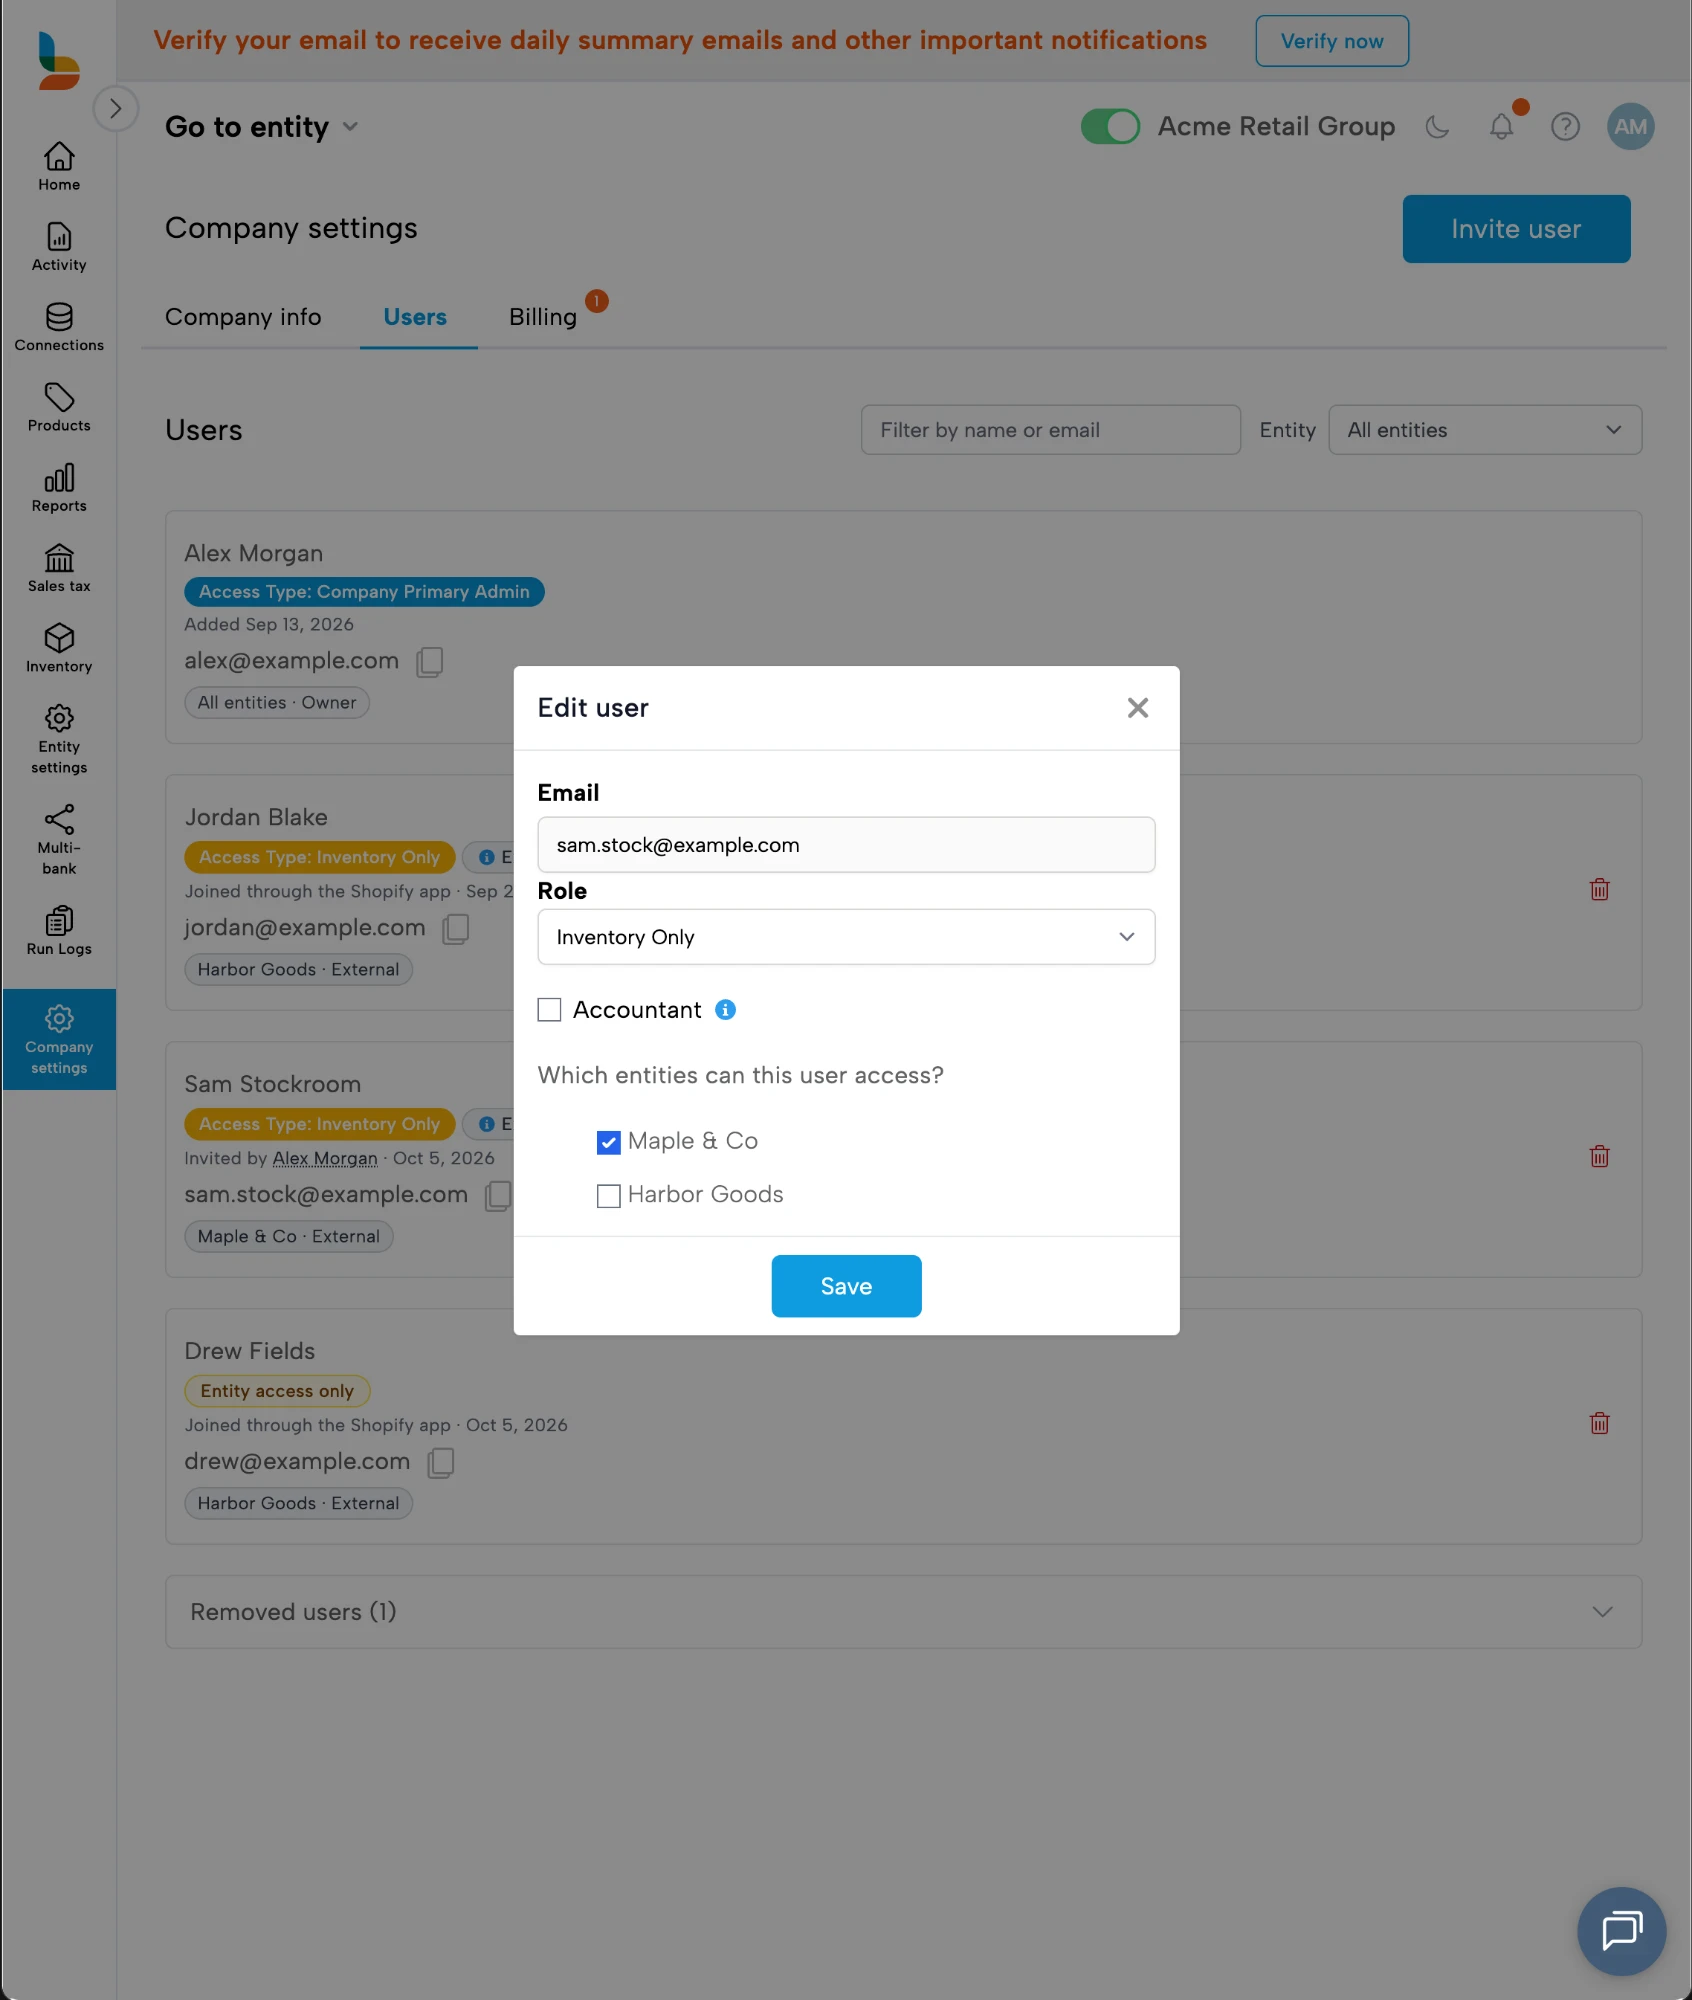
Click a user on the Users tab to open Edit user. Their role, the Accountant checkbox and their entities are all in one window. Choose Save to apply the changes.
Deleting Users
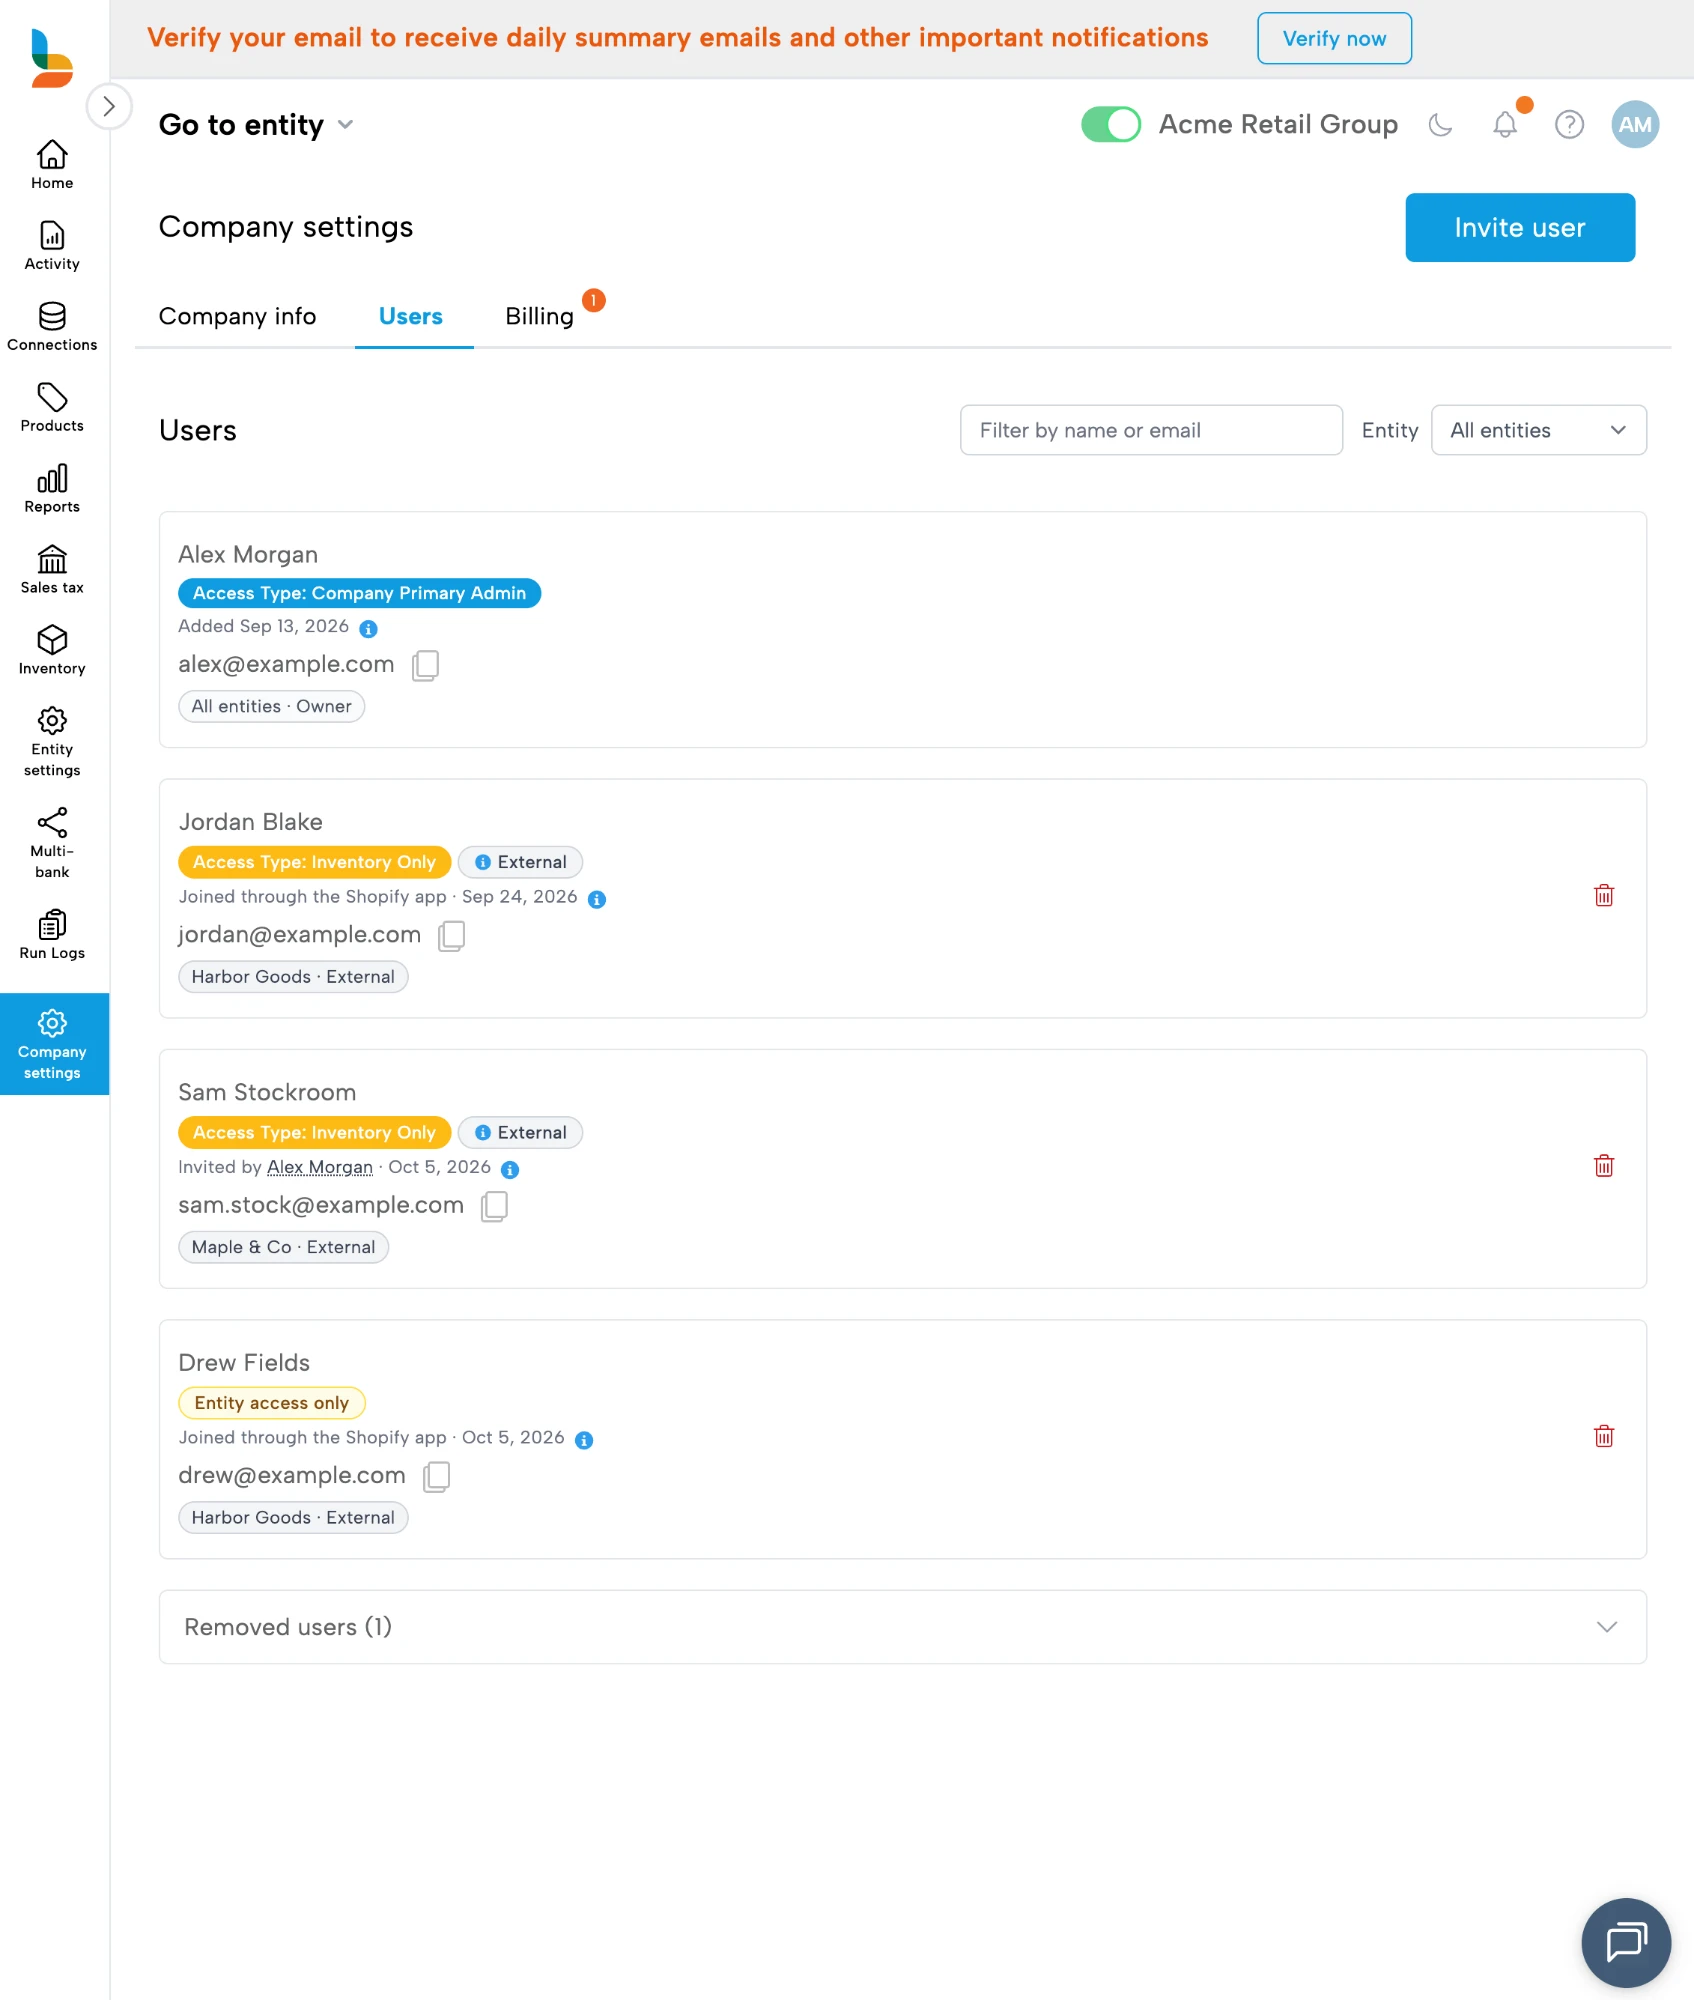
If you are the primary admin, you will see a red trash can icon next to each member on the Users tab under Company Settings. Clicking the red trash can icon will proceed with the deletion of that user from the respective company. Below, you will see the red trash can icon since this member is the primary admin who is logged in.
Only the primary admin can delete a user from a company.
For someone with Entity access only, the trash can icon removes them from every one of your company's entities they can access. A confirmation window appears before anything is removed, and the removal is recorded with your name.
If you remove someone who uses the Bookkeep app in Shopify and they open the app again later, they come back with inventory-only access (External), never Admin, even if a connect request names them. Your company admins receive an email whenever the Shopify app adds someone to one of your entities.
If you have any questions, contact support@bookkeep.com.